Set Up WordPress on Windows
Setting up WordPress on Windows for local development needn’t be hard. This tutorial guides you through it with all original software – no weird packages
Last Updated: January 11th, 2022
By: Steve
Contents
In this post I’m going to look at how to set up and run WordPress on Windows using Apache, MariaDB and PHP from scratch.
There are a number of pre-packaged variations of these utilities that are available for Windows, such as WAMP (Windows Apache MySQL PHP) and various others that I’ll not go into. These are very convenient it’s true, but they can do things in a more non-standard way on occasion. Installing everything for yourself will get your hands dirty and can be more useful from a learning perspective.
In most cases, the biggest reason for wanting to run WordPress on Windows is so that you have a staging area that you can play with before committing your changes to a live site that might be hosted somewhere else, such as SiteGround for example. If you’re going to use Google AppEngine to run your WordPress site you’ll definitely need this sort of staging area as you can only upload files through the AppEngine console.
It’s perhaps worth pointing out that Rocket.Net plans come with a staging site that you can work on and instantly deploy to live when you’re ready. I highly recommend Rocket.Net these days, over any of the other offerings – they’re not the cheapest but they are by far the best.
Using WSL (Windows Subsystem for Linux)
It’s also fair to say that I have done this setup on WSL for one of my production websites. It works absolutely fine. However, it’s not what I’m going to write about here in this article. The reason for this is that the WSL installation, although it is technically running WordPress on Windows, it’s actually running the Linux binaries. In this post I’m going to concentrate on the native Windows compiled versions of the software.
If you do want to use WSL (and Docker) to develop WordPress sites then I’ve written a detailed article on how to do that here.
Native Compiled Versions
MariaDB (non Oracle MySQL)
MariaDB is a MySQL fork that is compatible with MySQL. If you’re against using Oracle databases for whatever reason then MySQL isn’t going to suit you. MySQL was bought some time back by Sun Microsystems. And subsequently (almost immediately!) Sun was bought by Oracle.
Nevertheless, MariaDB is what we’ll use here and WordPress works absolutely splendidly on it.
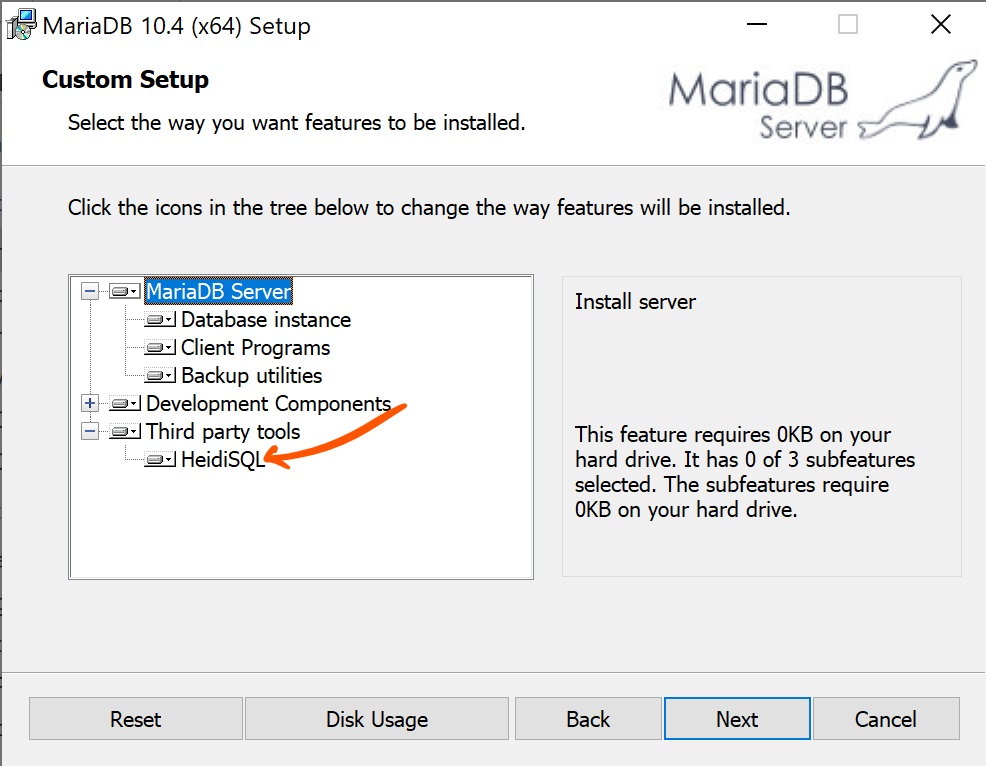
We’ll install this first because this is pretty much going to be the backbone of your installation. Installation of MariaDB is simple. You can download the Windows binary from https://mariadb.org/download/ and installation is as simple as clicking on the downloaded file and following the prompts. The screenshot to the left shows you the main installation screen. The only thing of real note there is to install Heidi SQL if you’d like an easy way to manage your databases after installing.
During the installation you’ll be prompted to enter a root user password. The root user is the main administrator user. Set a password that’s difficult for others to guess but for you to remember. You’ll need this password later.
Setup MariaDB for WordPress Database
Connecting to MariaDB
In order to install WordPress later we’re going to need a database configured within MariaDB. Since we’re installing MariaDB we may as well go ahead and set up the database now. Have a pen and paper ready or some way to jot down the settings that we specify. I don’t recommend that you use the same settings as me.
To begin setting up we’ll open up Heidi SQL that we installed with the MariaDB setup tool. If you didn’t install it and now want to, you can re-run the MariaDB setup and hit the ‘Change’ button when it tells you it’s already installed.
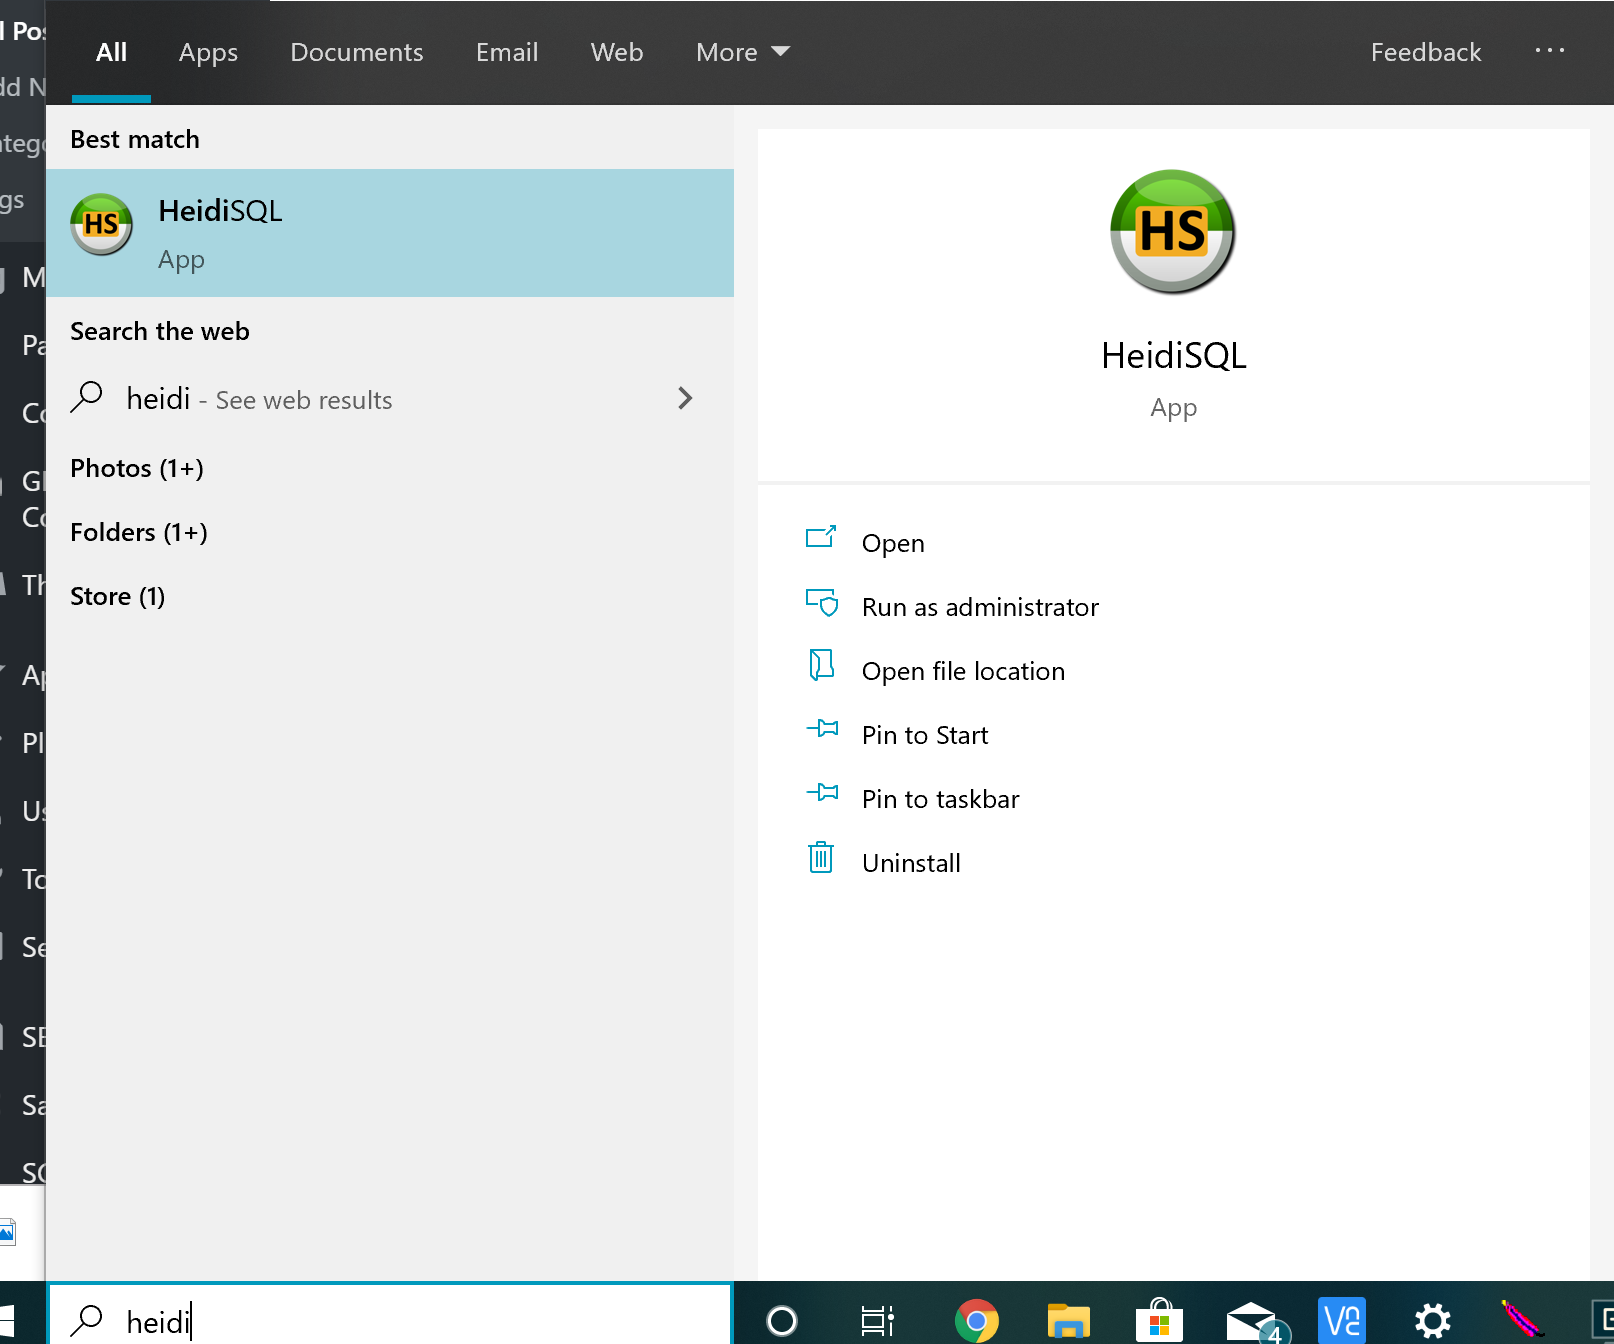
To start Heidi SQL, type Heidi in the Windows Search bar at the bottom of the screen.
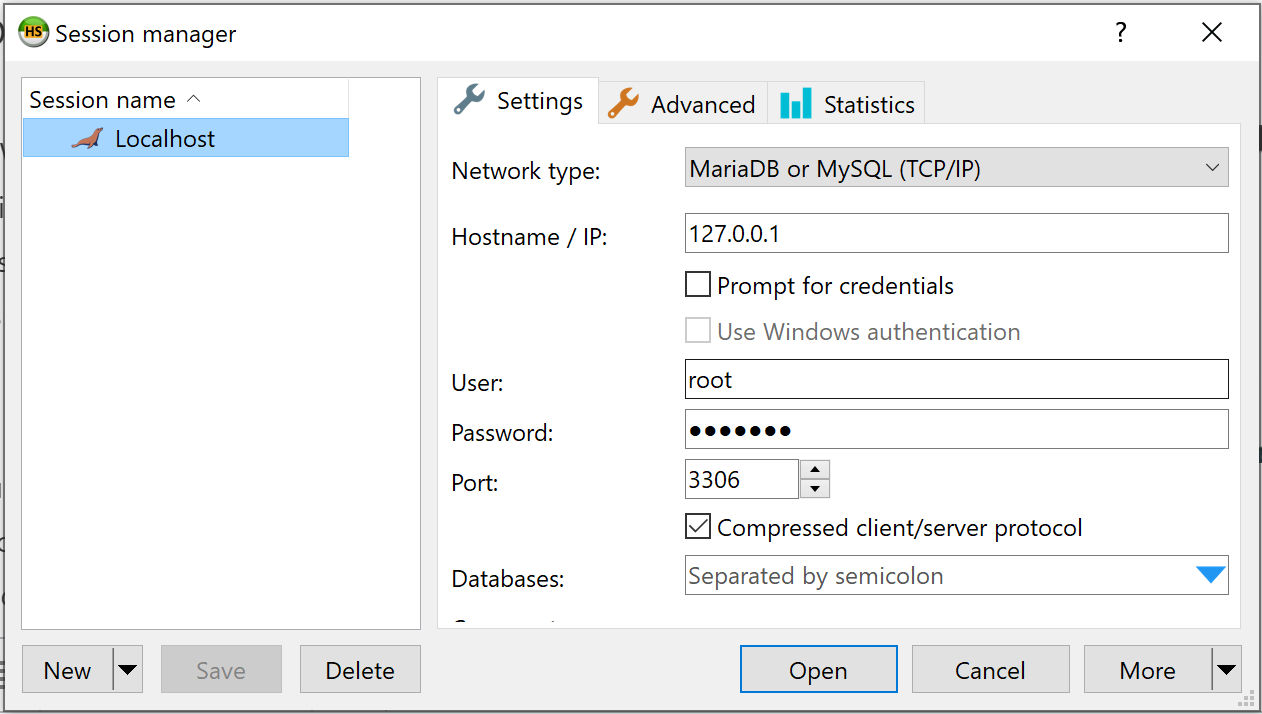
Once started, create a new Connection to a database. Your hostname / IP is either localhost or 127.0.0.1 – as you’ll be using your own computer for this. If you are installing Heidi onto a client computer versus the same computer then you’ll need to enter the IP address of the computer you installed MariaDB onto.
In the password box enter the password that you created when you installed MariaDB. If you changed the username of the root user at installation stage you’ll need to enter that name in the username field too.
Save the connection using the button on the bottom left. Once saved, click Open to open a connection to your database.
Create New Database for WordPress
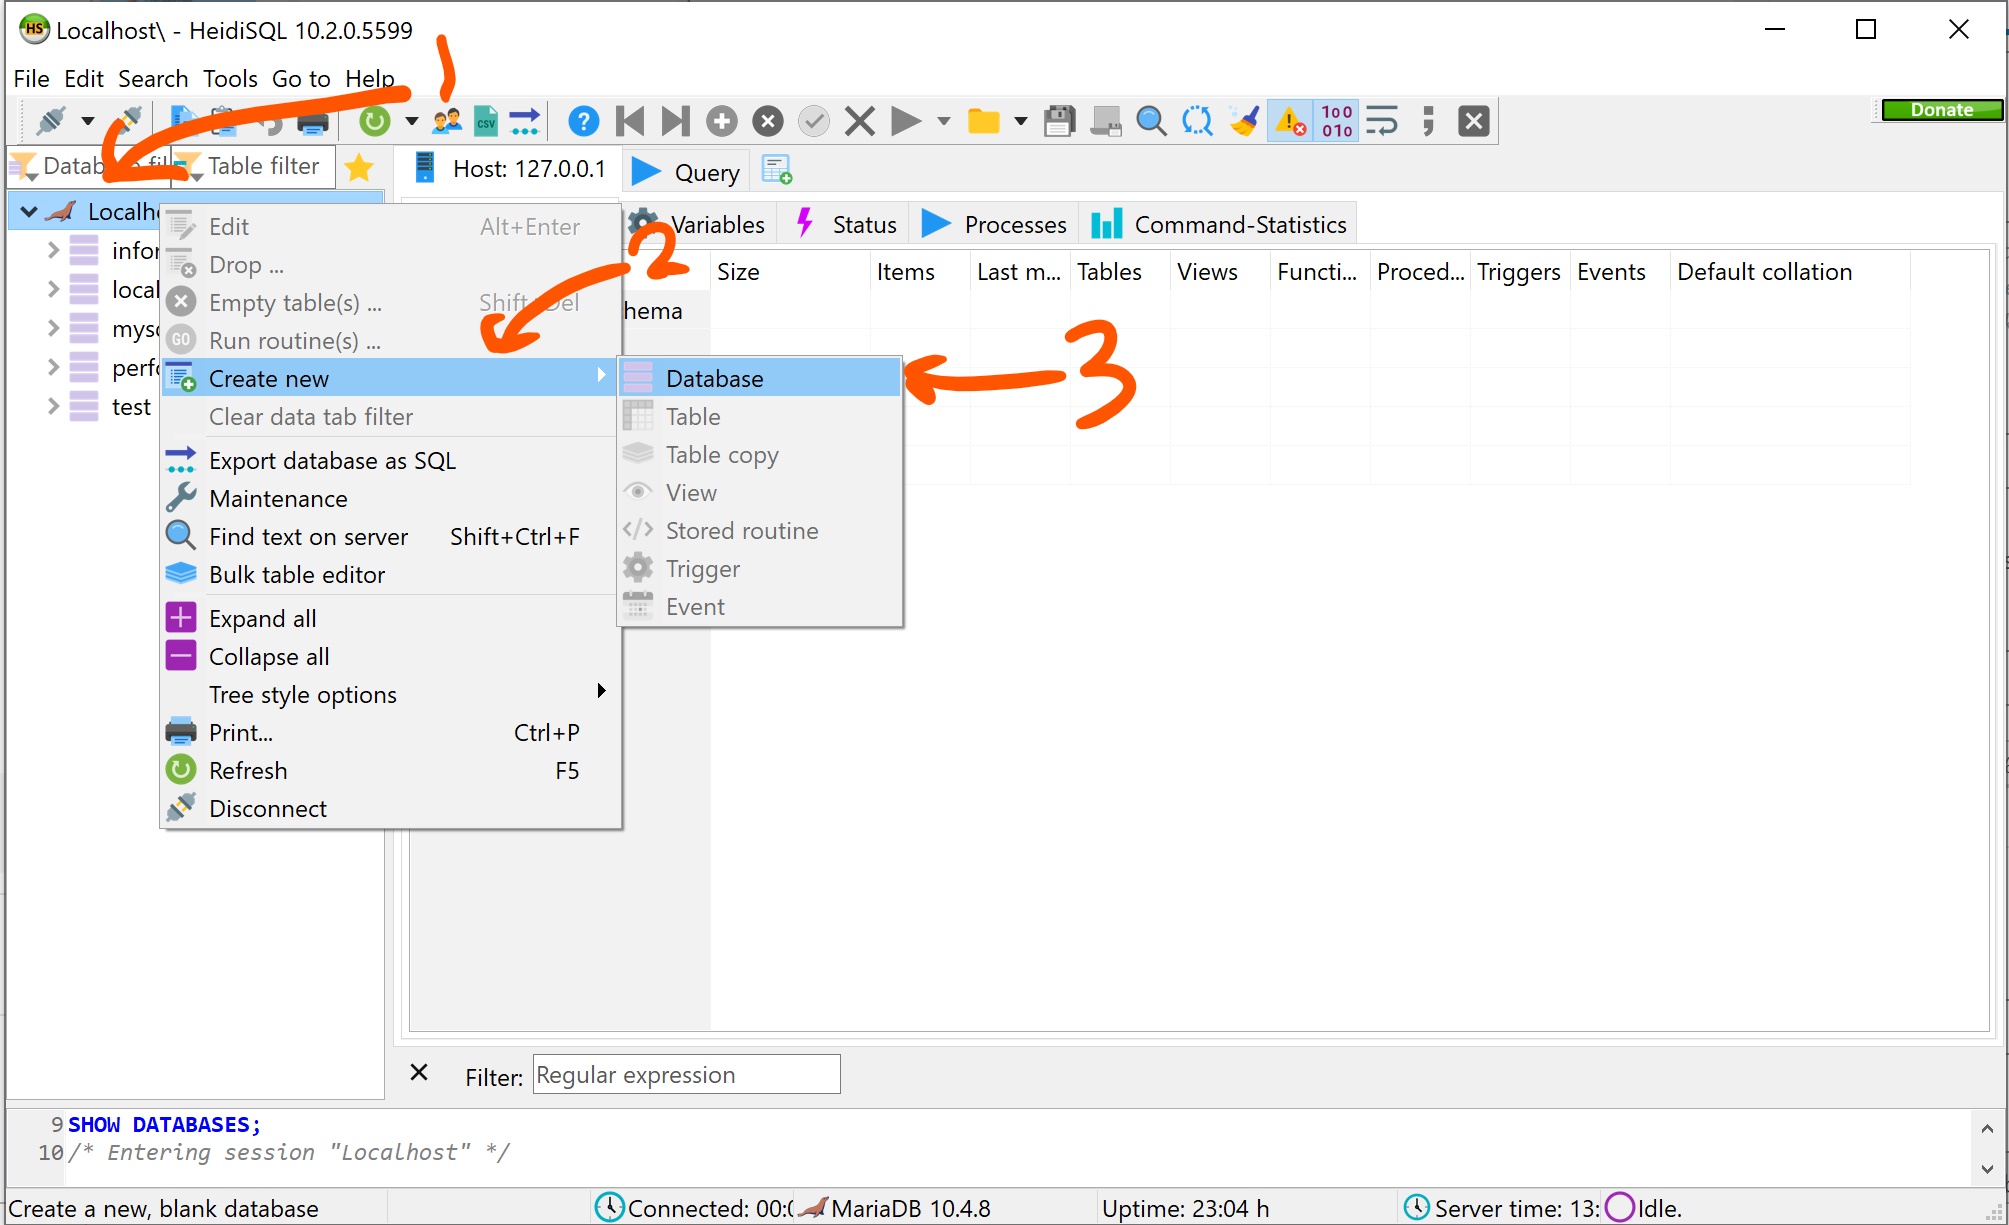
Once connected, you’ll see a large screen like the one below. To create a new database with Heidi SQL just right click over the connection, choose Create New and the choose Database. The image to the right should give you a better idea of how and where to click.
Doing this will open a new dialogue box where you can type the name of the new database you wish to store your WordPress data in. In the example image I’ve called ours wpbrains.
Add New User
You don’t want to login to your database as the root user for WordPress. Doing so could result in catastrophe for you. This is particularly true if you have more than one database or application that you’re going to run on the database. The root user will always have full access to all databases. This means that any weakness that can be exploited through WordPress could affect any other database too. For this reason, we create a new database user that only has privileges to access our new WordPress database.
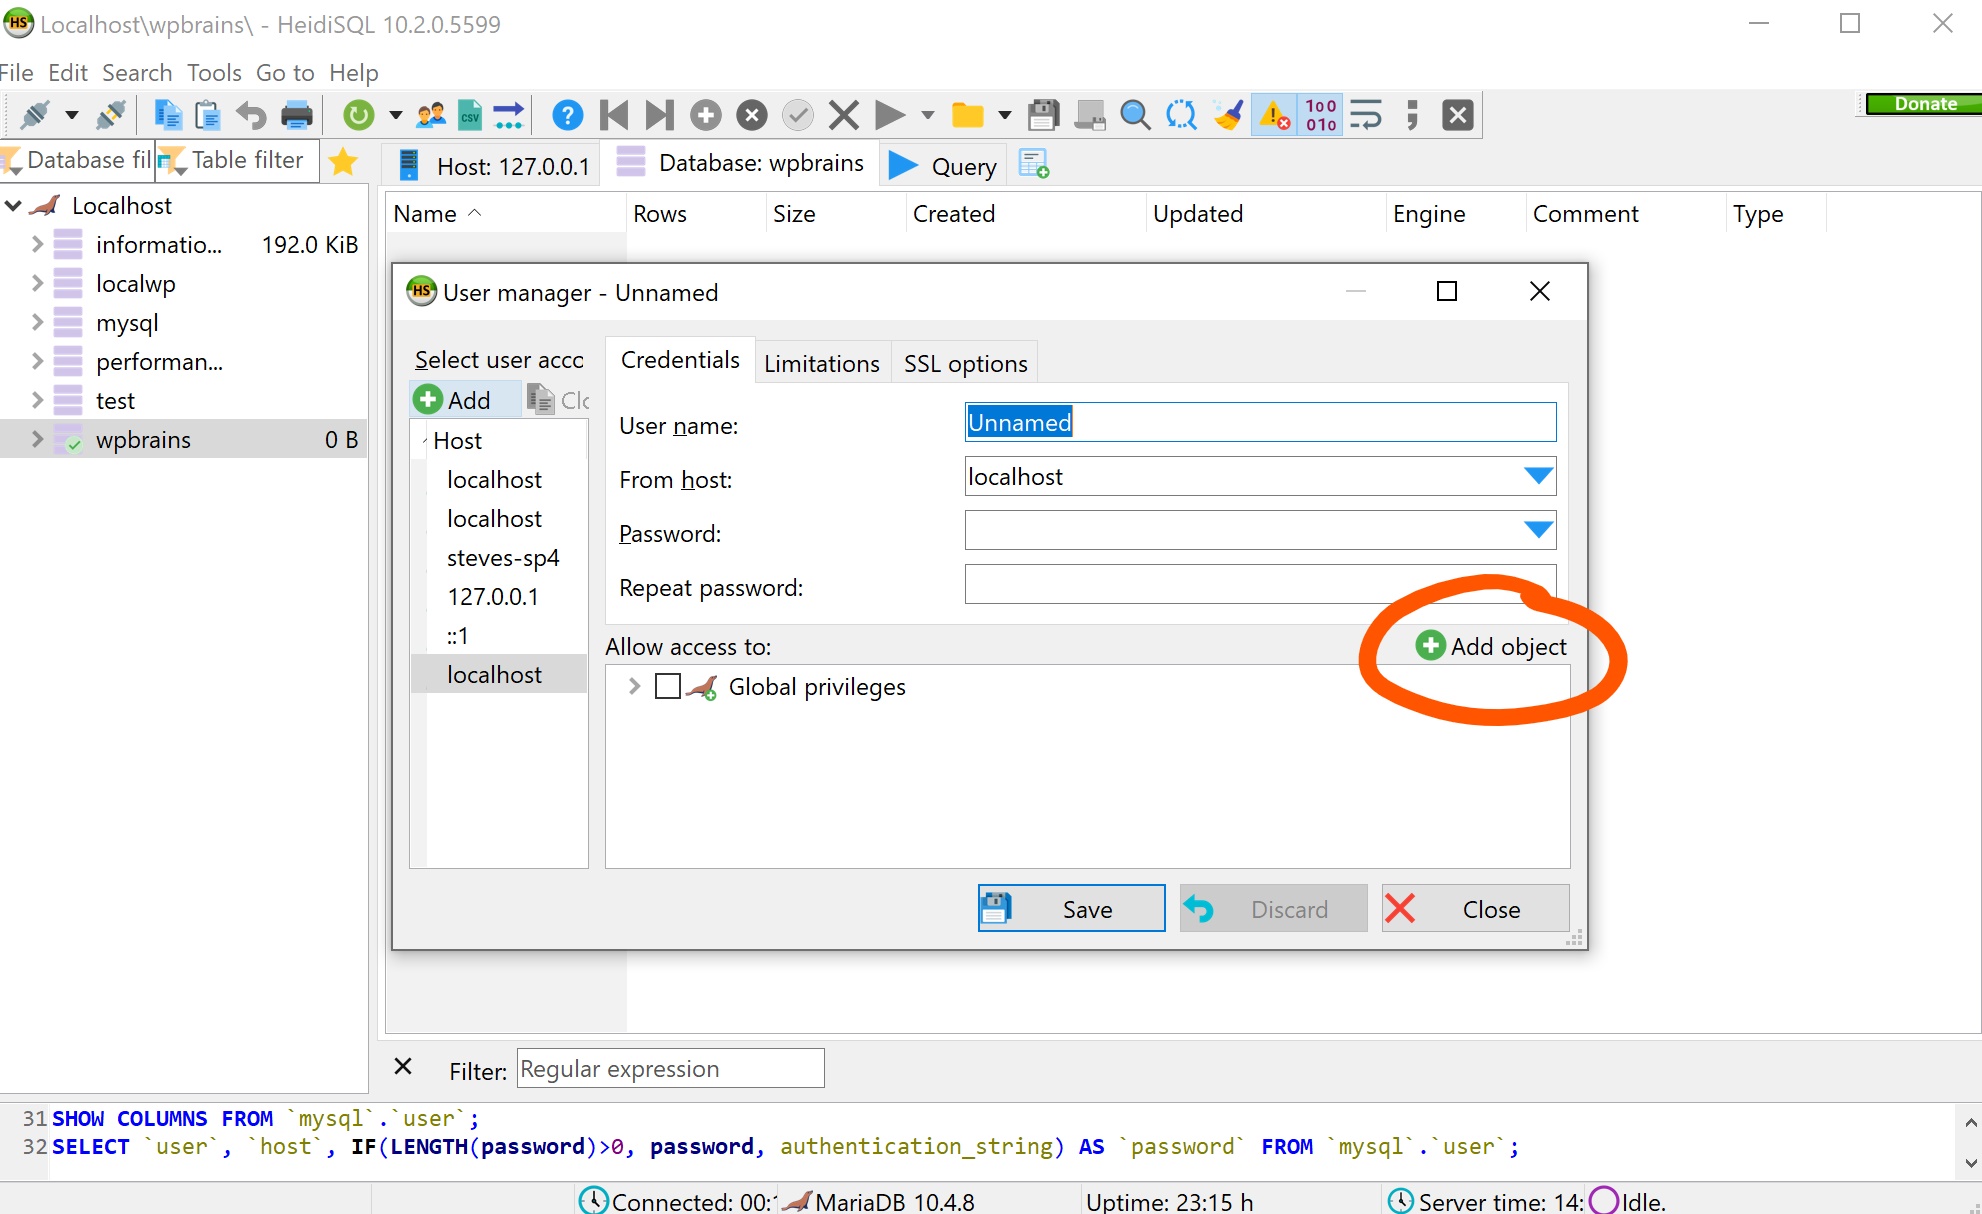
To access the User Manager, click the little person image on the Heidi SQL main window toolbar. This will bring up the user manager for your database.
You’ll notice that the initial screen only shows Global Privileges at the bottom under the Allow Access To: section. We don’t want to grant global privileges to our new user, so click the Add Object button highlighted with the red circle in the diagram. This will bring up a small dialog box from which you can choose the newly created database wpbrains in our case. Yours will be called something different.
Choose the new database and click OK. You will then see your new database in the list of objects to Allow Access To in the bottom window. Pop a tick in the box next to your database as you’ll likely want to give all permissions to your new user. You can select specific permissions if you want. Indeed, removing the drop and alter commands will potentially improve security. But in reality, any hack that destroys your database will likely do so using DELETE from commands – which you actually need in order to run your database optimally anyway. Backups are the best way to avoid data loss from hacks.
Set Username and Password
Fill in the Username and Password fields for your new user and make a note of the username and password you gave. We’ll need these details later when setting up WordPress. Alternatively you can leave these steps until you come to setting up WordPress itself so that the details are fresh in your mind.
Once you’ve filled in all the details you can click Save and close everything down. You’ll not need to enter any manual table details or anything – WordPress will do all that for us when we set it up later.
Apache on Windows
The next step to successfully setting up WordPress on Windows is to install the webserver itself. There’s two main choices when it comes to running WordPress on any host and that’s either Apache or NGINX. In this case we’re going to use Apache. Apache is the most popular web server available and runs very well on Windows as well as Linux or MacOS. Again, Apache will run nicely under WSL, but we’re not going to look at that because it’s then going to be running the Linux version.
Download Apache
Apache is freely available for download from https://www.apachelounge.com/download/
This may seem a bit of an odd choice to download from since it’s not the official website. The official website is at https://httpd.apache.org/download.cgi but Apache themselves don’t provide any pre-built Windows binaries. They do however list ApacheLounge as one of their official sources. PHP also lists this particular site and set of builds as the versions to use for Windows.
Install Apache
Installation in this case is a bit of an oversimplification. Apache doesn’t really ‘install’ itself in this case. The download is actually just a zip file containing all the necessary files to start it running. So, for me, I just unzipped it into the c:\ directory. Unzipping it there ended up creating a directory called C:\Apache24.
You may want to install it somewhere else though. Just make a note of where you installed it.
At this point in time you will only be able to start Apache manually, not as a service or at logon. We’ll look at how to do that shortly. For now, it’s not configured properly anyway.
Configure Apache
All the configuration for Apache is done through the httpd.conf file which is found under C:\Apache24\conf directory – assuming you installed it there. To modify this file, right click over it and choose Open With… and then choose Notepad when asked. This will enable you to open the configuration file at any time later with Notepad again.
There’s a few key areas that you may need to change;
- ServerRoot – This is the directory where Apache expects to find everything. In the case of this tutorial it will be set to C:\Apache24. You should change this to match where-ever you unzipped Apache to though.
- LoadModule – There are a number of these configuration switches in the config file. The defaults probably suffice, but you’ll potentially want to uncomment the LoadModule rewrite_module line and the LoadModule ssl_module line.
- DocumentRoot – You can change this if you want Apache to serve the website from a different directory. This might be a good idea, as it will keep everything separate.
With those changes made you can start Apache and test it. It’s worth doing this test before installing PHP as something wrong now will be made harder to find if you install PHP. To test it, just navigate to C:\Apache24\bin and double click on httpd – you’ll get a console window come up that is blank.
If everything is working correctly you should be able to use your browser to point to http://localhost/ and it should give you a message along the lines of It Works!
PHP On Windows
In order to run WordPress on Windows we’re now going to need to install PHP since that is the programming language that WordPress is written in.
Download PHP for Windows
PHP for Windows is available from https://windows.php.net/download/ – and it’s very simple to install. I went with the VC15 and PHP7.3 at the time of writing. The actual zip I used is available at https://windows.php.net/downloads/releases/php-7.3.10-Win32-VC15-x64.zip – but I recommend visiting the download page to get the latest version.
Install PHP for Windows
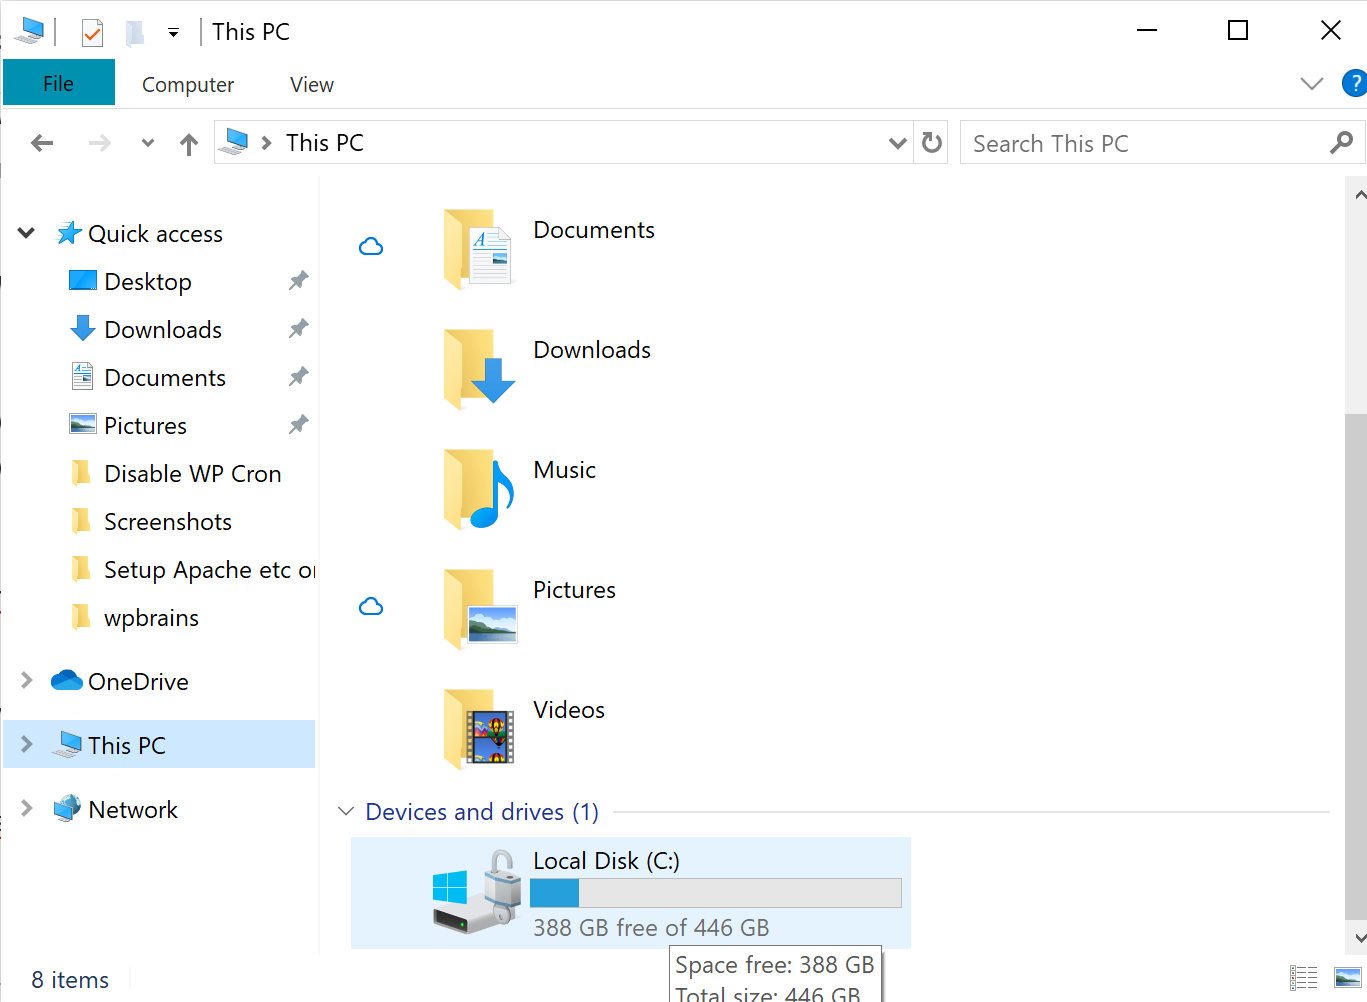
In this installation I will install PHP into the C:\PHP directory. Similarly to the Apache installation this is simply a case of extracting the ZIPped download file. To make sure it goes into the right place, open File Explorer. Select This PC. Select the C: drive at the bottom of the screen by double clicking it.
Once you are looking at the C: drive, right click over some blank space and select New->Folder. Call this new folder PHP.
You can then return to your downloads directory and double click the PHP downloaded file. When it asks you where to extract the file to – choose C:\PHP and your PHP installation will be installed.
Configure PHP
All configuration for PHP is done through an INI file (INI = Initialization) which is located in the C:\PHP directory. After unzipping there’ll be 2 ini files present – one will be called php.ini-production and the other is php.ini-development. You can decide which one you want to use as a basis for your own configuration. I used the development one since this setup is for development purposes.
Copy the chosen file to just C:\PHP\php.ini
Then open the newly copied php.ini file in Notepad to edit some of the settings. The following settings are worthy of investigating;
- extension_dir – You’ll probably want to set this to C:/php/ext – but replace c:/php with where-ever you installed it. Notice: The directory slashes are around the wrong way for Windows. Normally you’d expect C:\php\ext but in this case you must use the forward slashes c:/php/ext
- extension = curl – This will activate the cURL extension which allows PHP to talk to other sites from code. This will be needed for automatically installing themes and plugins and other things.
- extension = gd2 – This extension is used for graphics modifications by the WordPress media library. Other plugins might use ImageMagick but by default GD2 is used.
- extension = mbstring – This extension is responsible for multi-byte string conversion. I’m not entirely sure why WordPress needs it – but it allegedly does.
extension = mysql– This extension speaks for itself. It’s used to enable communication from PHP to the MySQL or MariaDB server where WordPress will store all it’s configuration and post data.extension = pdo_mysql– This is an extra MySQL extension that if present can be used by WordPress.extension = xmlrpc– This extension is a little bit optional in that you may decide you don’t want to use the WordPress XMLRPC interface. It’s only really used for other sites to communicate with your WordPress application. Plugins such as JetPack do use it though. So it’s up to you.
Save and exit the PHP.INI file once you’ve made those changes.
Add PHP to the PATH Environment Variable
This step isn’t necessary if you only ever want to run PHP scripts from inside Apache. However, if you want to run the WP-CLI ( WordPress Command Line Interface ) later on you’ll need this. It won’t hurt to do it, so we do it here. I use the WP-CLI for various things anyway, so I guess I would.
I find it better to add the PHP directory to the System Path rather than just to my user path. In this way any other process can use the WP-CLI too. But you may choose either option.
To add PHP to the path, open the Settings application. This can be found by clicking the Windows Logo on the taskbar in the bottom left hand corner of your screen. From the popup Start Menu, click the little cog icon to bring up the Windows Settings screen.
Type Environment Variables in the Find A Setting box. Choose which option you prefer from the drop down.
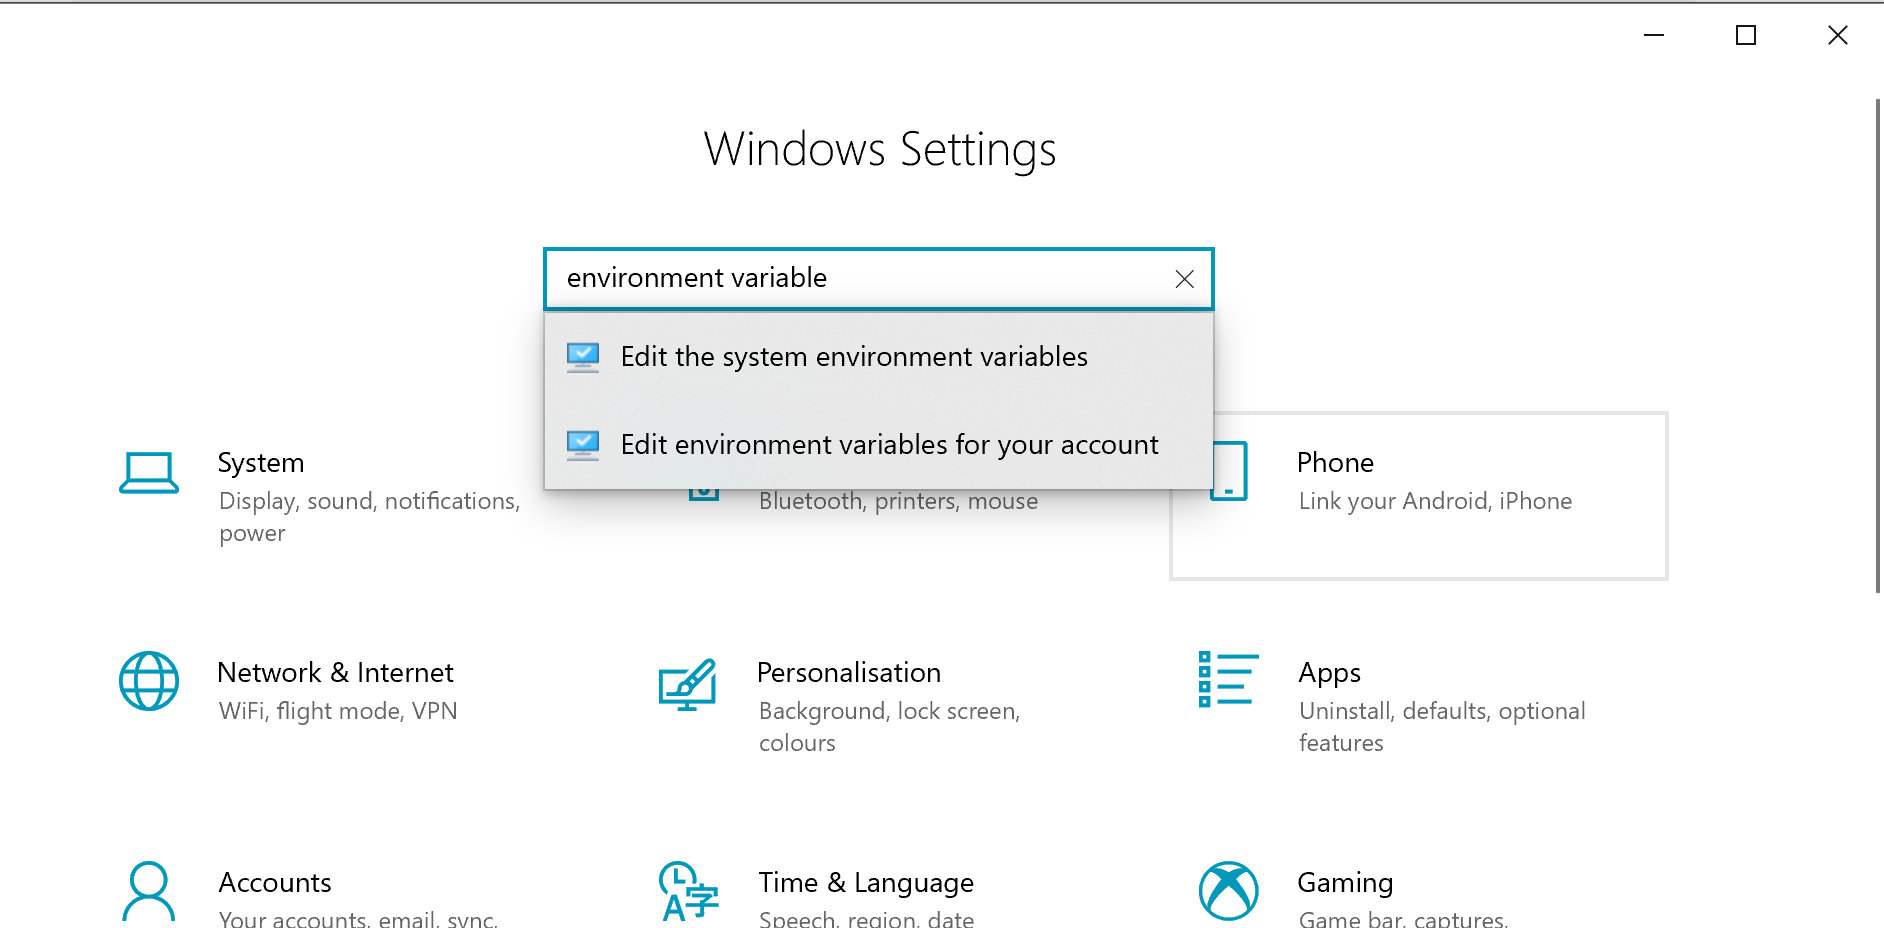
When you choose the option you require, you’ll be presented with another little Application screen to actually make the changes. The screen shot to the right shows you which buttons you need to press to get to the PATH environment variable. Click the Edit… button and add C:\PHP to the list of variables. On older versions of Windows you need to input the PATH on one long line, with each entry separated by a semi-colon ( ; ). New versions show the PATH as a list. Add C:\PHP to the list.
Once you’ve made the change, save the details. You may need to log out of your Windows account and log back in for the changes to take effect, although I didn’t have to do this on my installation.
You can verify whether this has worked correctly by opening a command shell. Type cmd into the Taskbar Search box. When the Windows command shell comes up, type php -v to see the version of PHP your Windows has installed. If you get a message that the command could not be found then you’ll need to revisit the steps above to make sure you’ve correctly set up the path.
Configure PHP as an Apache Module
We’re almost there. Keep going – you’re doing well.
Next we’re going to enable Apache to use PHP scripting engine to display web pages. This is relatively straight forward. First we need to open the Apache configuration file again. Do you remember where it is?
C:\Apache24\conf\httpd.conf
Open that file in Notepad again.
Look for any lines in the httpd.conf file that start with DirectoryIndex index.html – add index.php in front of the index.html but after the DirectoryIndex command. This will instruct Apache to use any index.php it finds as a home page. If no index.php is present then Apache will look for index.html instead. But index.php will take precedence if we insert it before the index.html entry.
Then add the following section to the bottom of that file;
# PHP7 moduleLoadModule php7_module "c:/php/php7apache2_4.dll"AddType application/x-httpd-php .phpPHPIniDir "C:/php"
You may need to modify your directories if you installed things in a different place to our demonstration.
Save the file and exit Notepad.
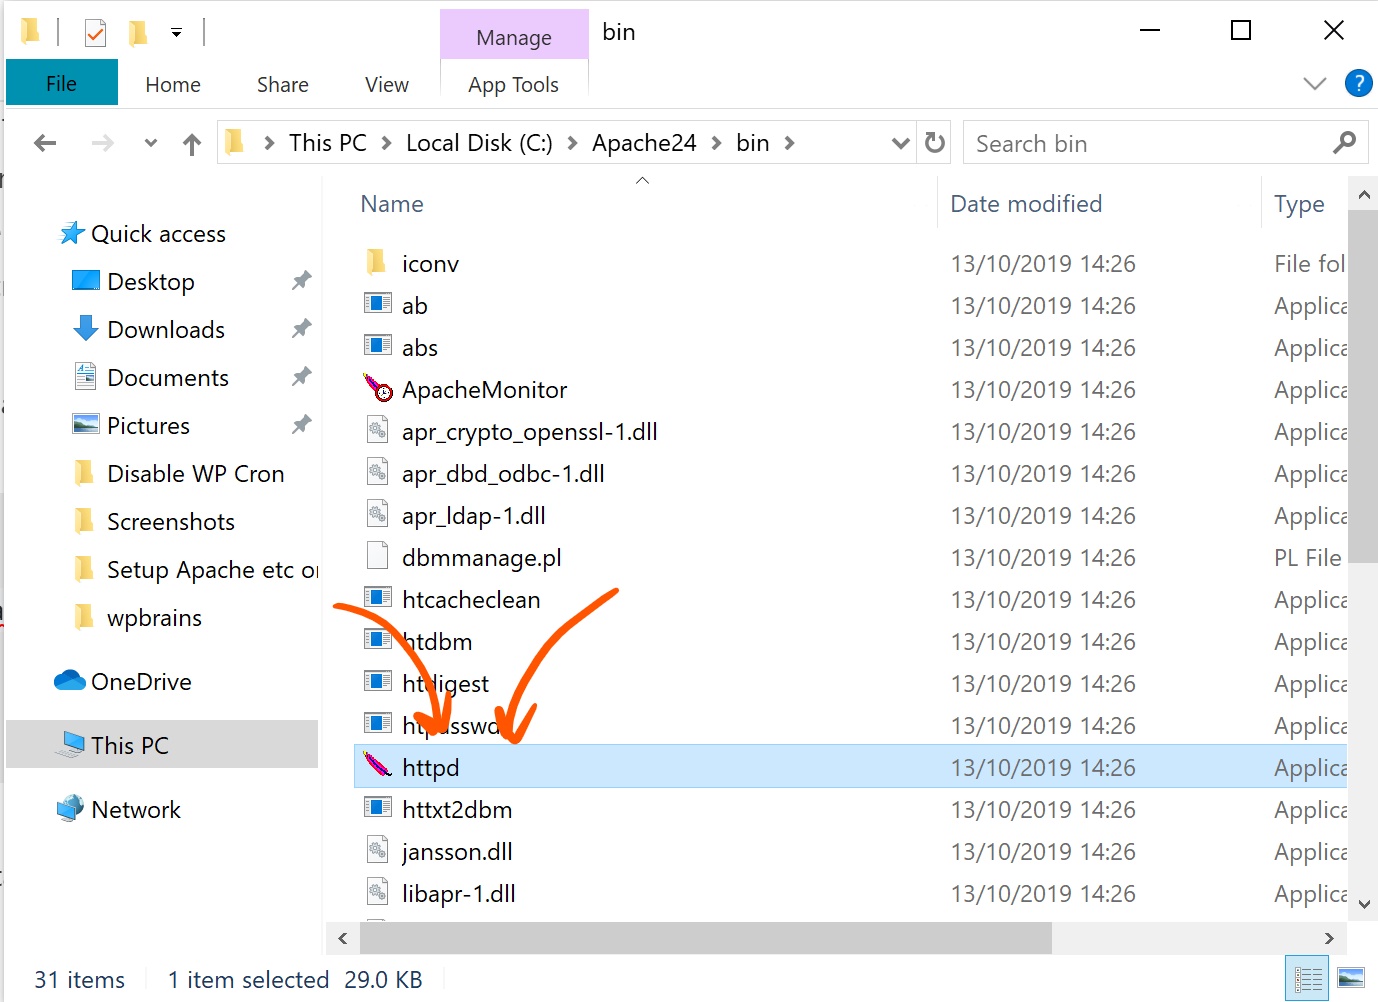
From File Explorer, double click the C:\Apache24\bin\httpd.exe file to start up an instance of Apache. The image to the right should help you locate it. When you double click this you might get a Windows Firewall popup asking if you want to allow it to listen for connections. You should check the options and select Yes to private networks.
I’d recommend NOT selecting yes for public networks. This is particularly true if you ever use your machine in any public places such as Cafes or Airports or any other public WiFi.
Test PHP
To test PHP is successfully working we need to create a PHP file. The quickest way to do this is to create a file in C:\Apache24\htdocs called index.php
In that file enter the text below;
<?phpphpinfo();?>
Save the file and then point your web browser to http://localhost/
If everything is working you should see a whole bunch of configuration information about your PHP and Apache server. Congrats!
Install Apache As A Service
You might wonder why didn’t do this earlier. I’ve just found that it costs me less hair tearing to make sure everything works before installing as a service. So I play with Apache by opening and closing it by double clicking from File Explorer until I’m happy.
But, if everything is now working for you and you managed to see the output from your PHP tests above, go ahead and install Apache on to your computer as a service. Doing this will enable your web server to start when the computer starts rather than you having to do so manually.
Start An Administrator CMD Window
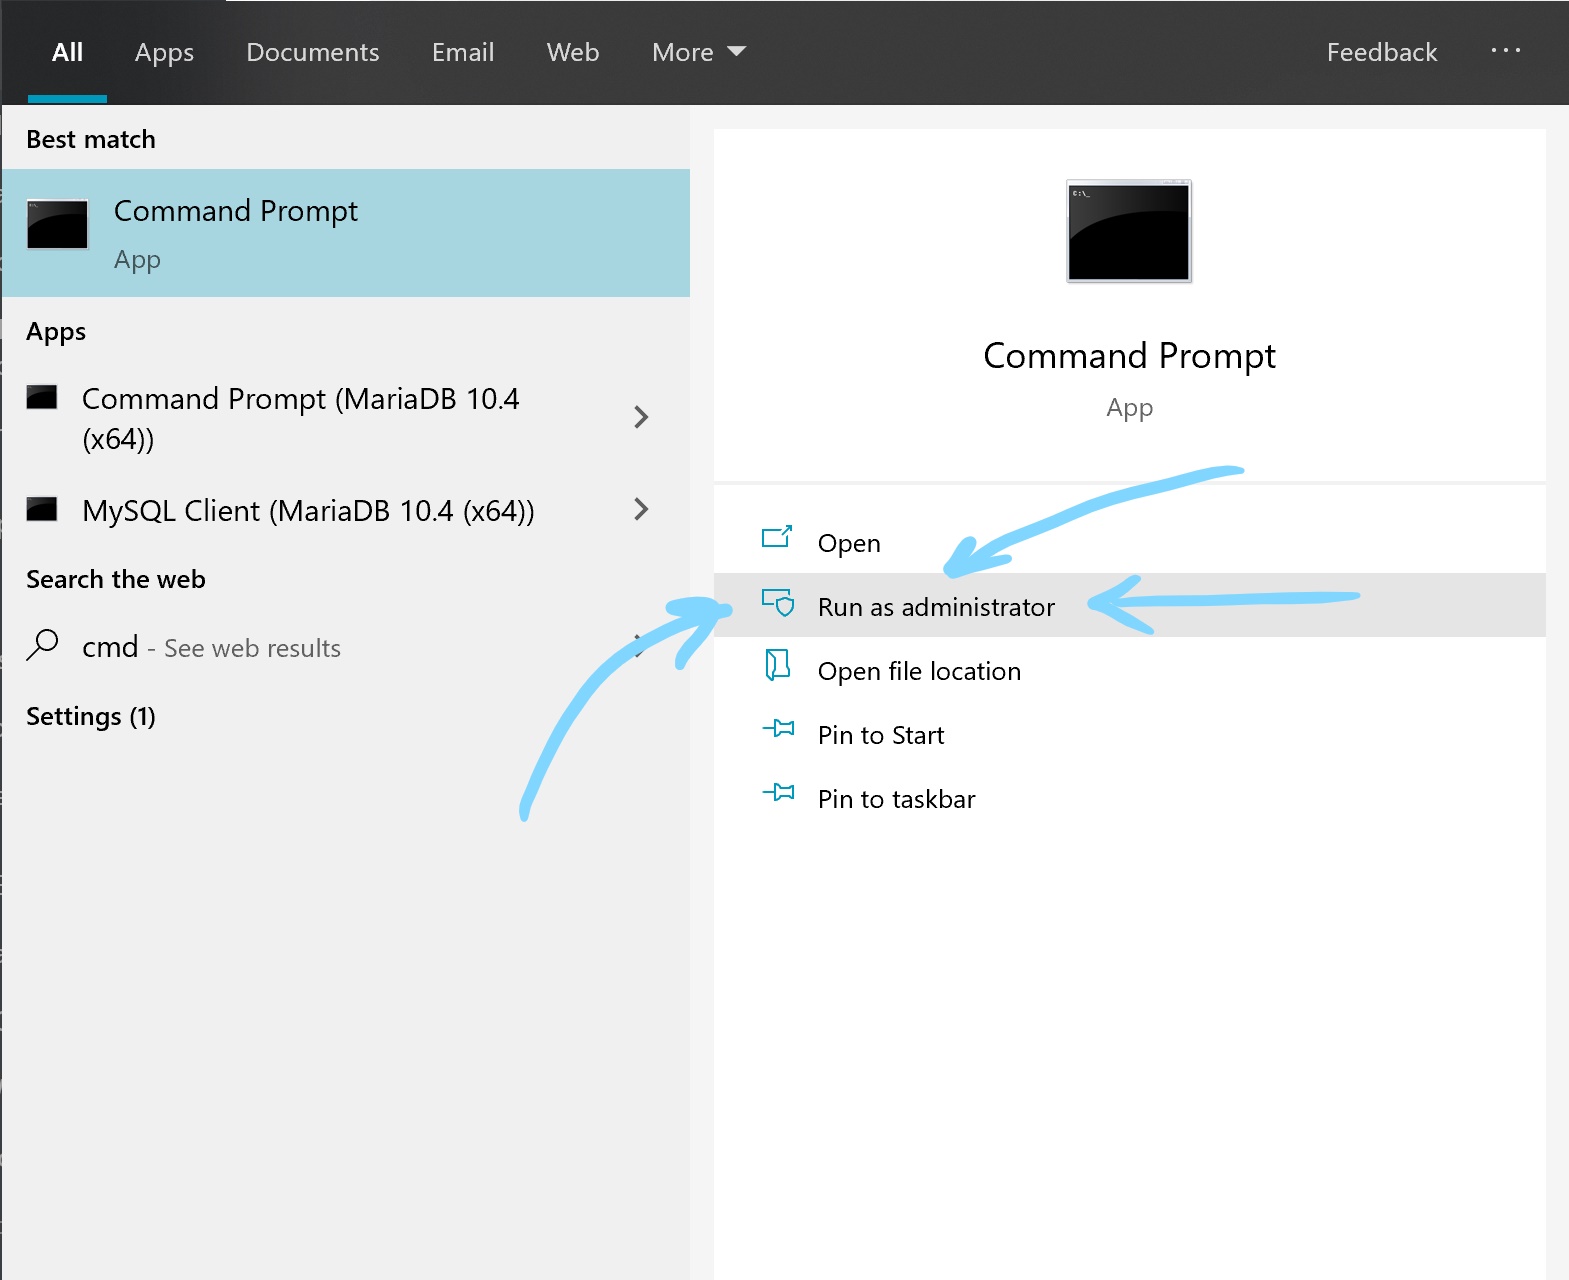
For Apache to be installed as a service you need to be running as an Administrator. Normal users do not have access to the Services Manager of Windows. To start a command window as an administrator type cmd into the Windows Search box. See the screenshot to the left for more information.
Make sure you click Run As Administrator.
This will then pop up a confirmation screen for you to accept and then a new Command Window with Administrator privileges.
Install Apache As A Service
Type the following commands in the Administrator CMD Window
c:
cd \Apache24\bin
httpd -k install
You should then see something like the following;
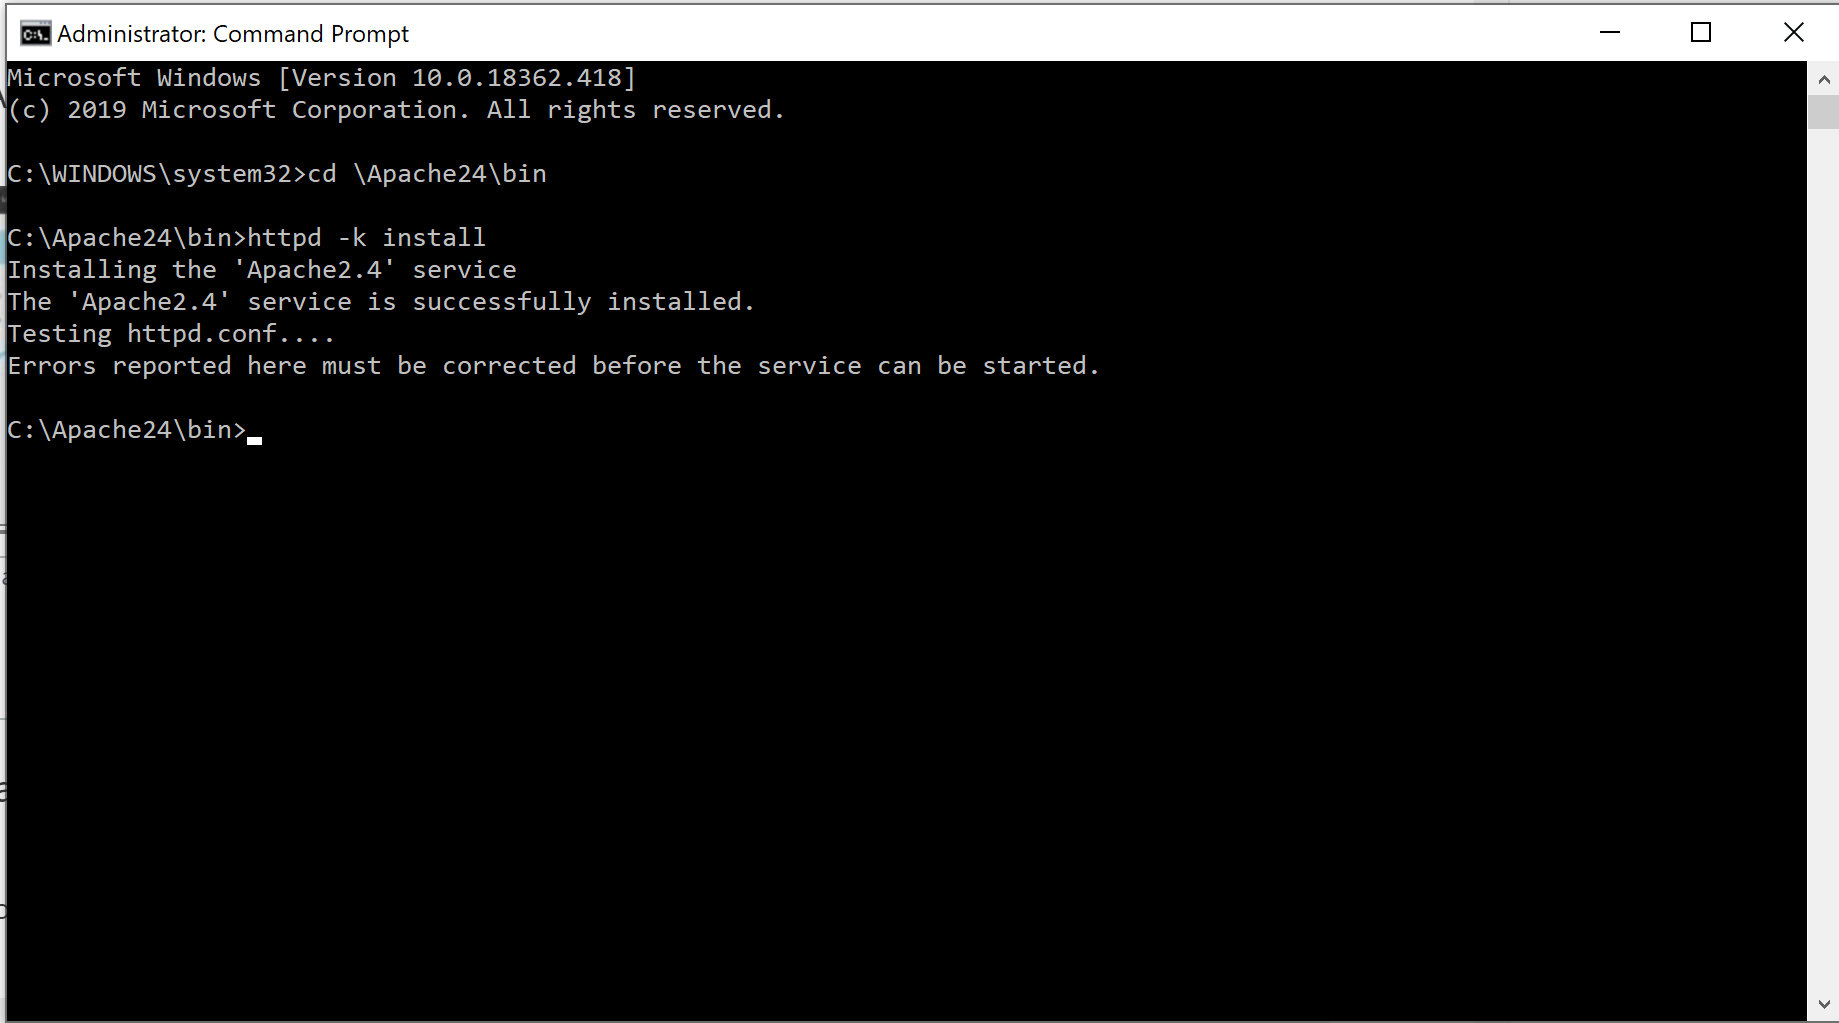
On my system the service did not start after it was installed – although it was set to start automatically so I assume after a reboot it would have. Nevertheless, typing the command net start apache2.4 started it without error.
That’s the hard graft done. Now we can finally install WordPress.
Install WordPress On Windows
To be fair, the installation of this bit is pretty much the same no matter what platform you’re running on. The Windows specific parts have all been done really. But this guide will assume you’re running on Windows and you’ve installed everything to run from C:\Apache24\htdocs
Download WordPress
You can download the latest version of WordPress from https://wordpress.org/download/
For Windows users we recommend downloading the ZIP file version as this can be extracted using File Explorer.
Install WordPress
To begin the installation, unzip the downloaded file into C:\Apache24\htdocs directory. If you modified the DocumentRoot setting in your Apache configuration in the earlier steps then you’ll want to unzip into that directory instead.
Unzipping the WordPress zipped file will create another subdirectory called wordpress in the htdocs directory. I’d recommend moving everything from the wordpress directory into the htdocs directory rather than running WordPress from that subdirectory but you can run it from there if you prefer.
Open your browser and enter the location http://localhost
You should see a screen like the one below;
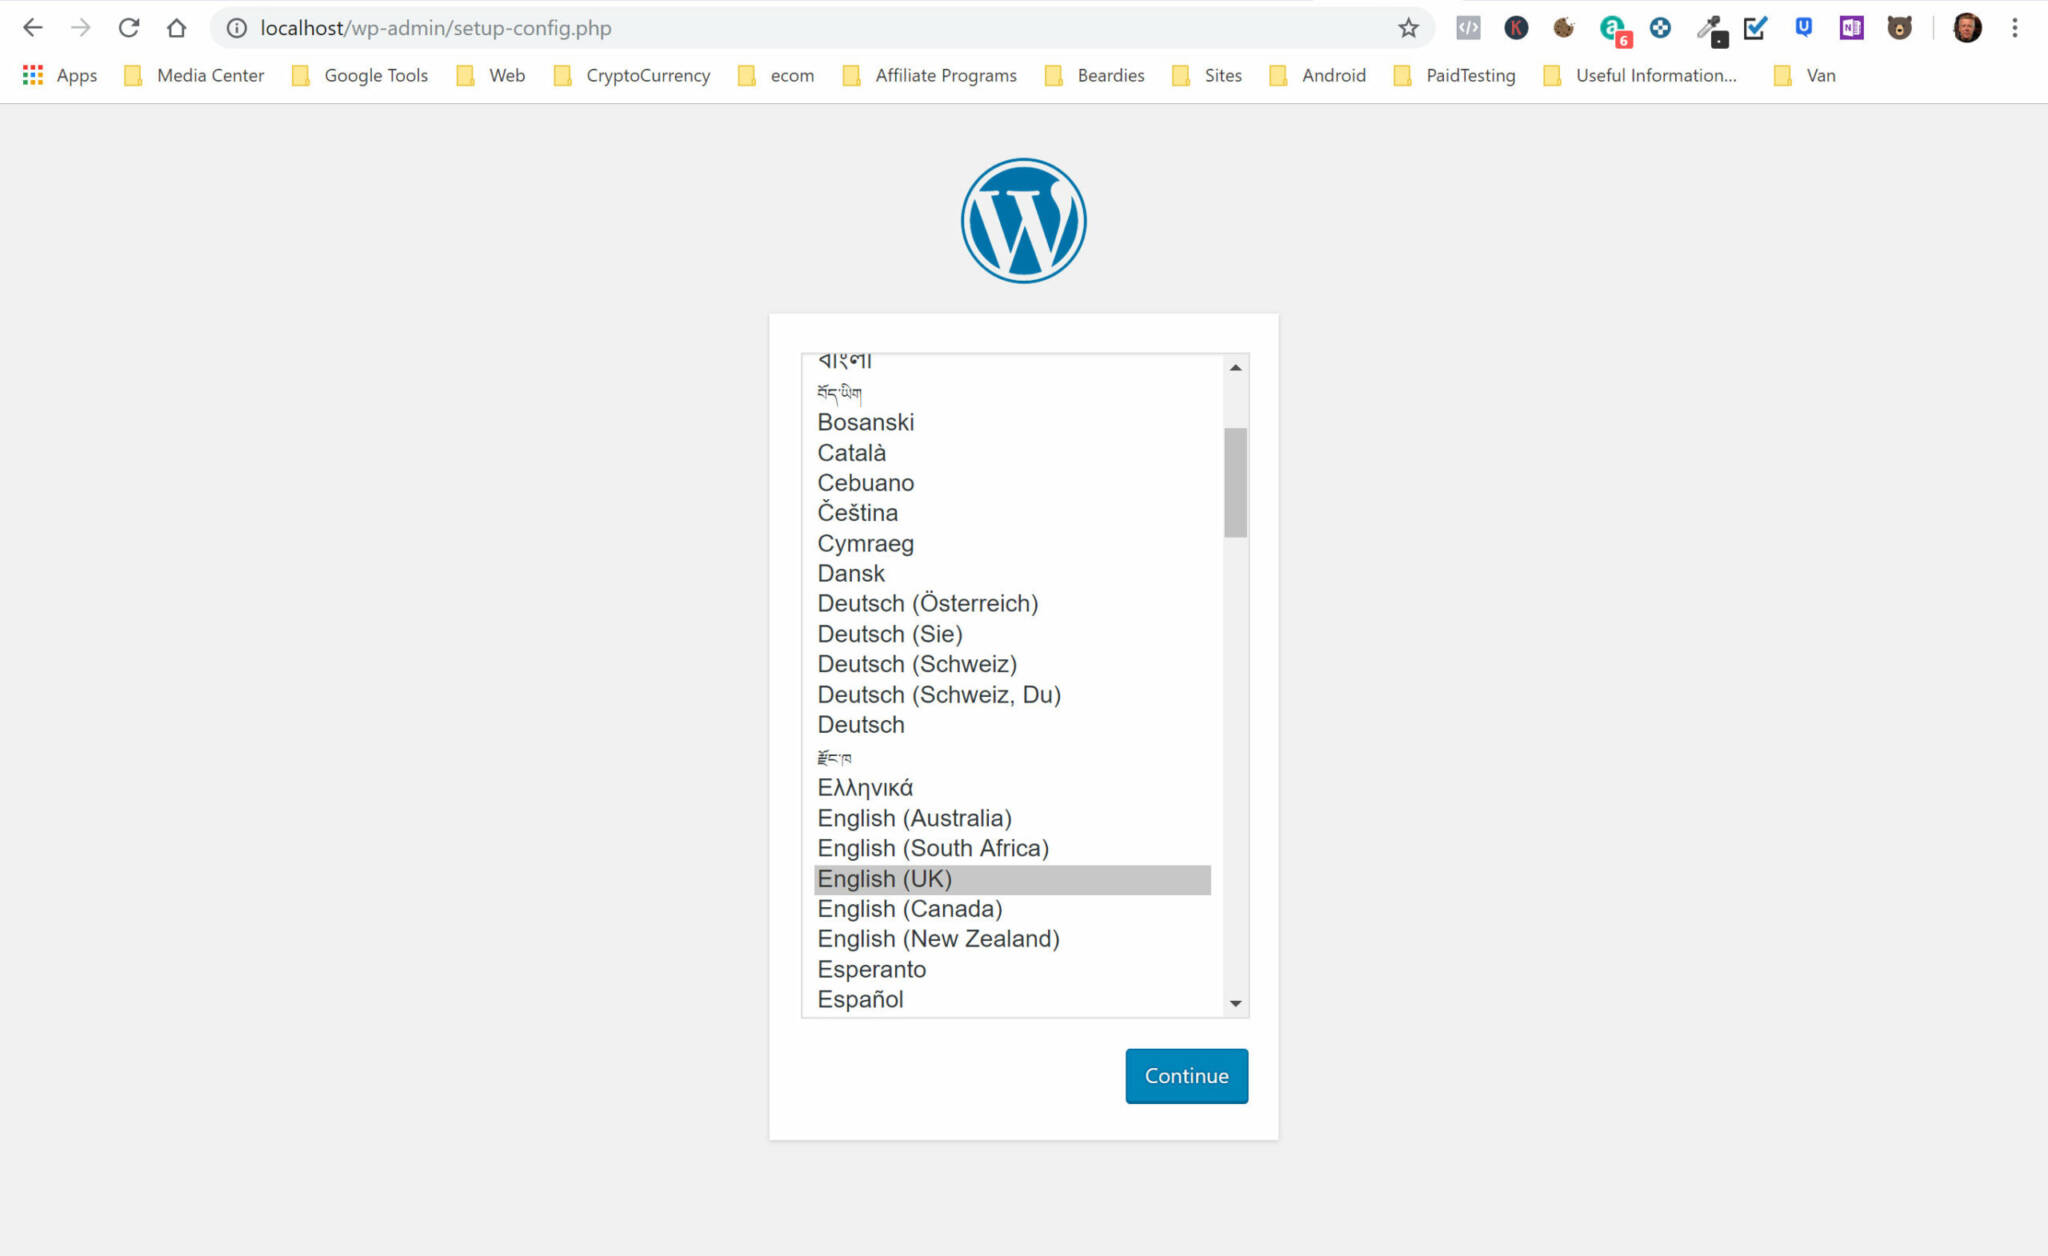
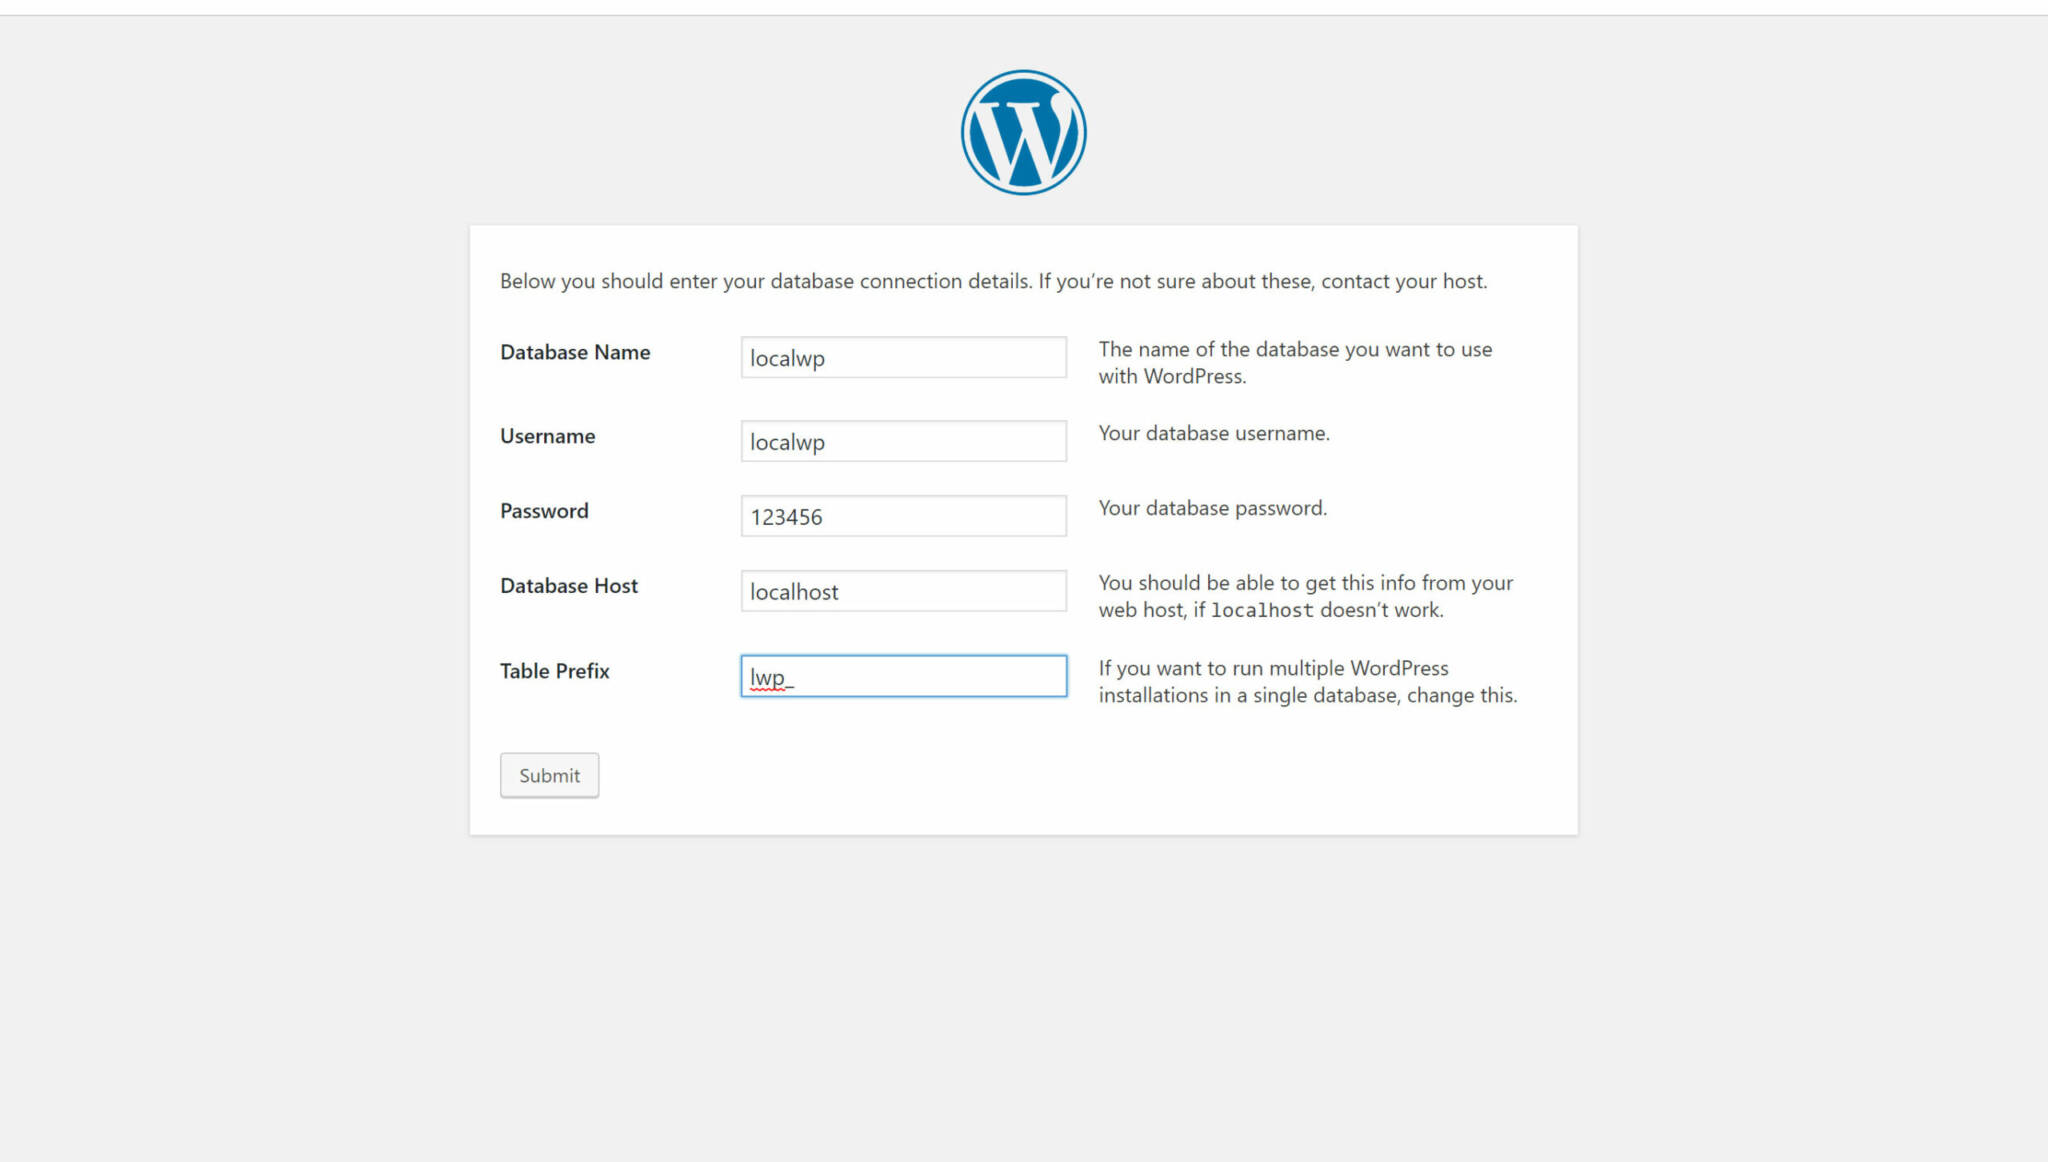
Choose your desired language and click Continue. Hit the Let’s Go button on the next screen to be presented with the database settings screen. This is the screen we mentioned way back up in the article when we were setting up MariaDB. Remember the username we created for the new WordPress database? And the database name itself? Good good – enter them in the screen here as shown below;
Then you’re pretty much into the realms of customizing your WordPress installation – which is the topic for another day!
We hope you found this tutorial useful for setting up WordPress On Windows. If you have any questions or comments please feel free to leave a comment below. We look forward to hearing from you!


