Use A Proxy Server To Help Secure Your WordPress Admin
Learn how to secure your WordPress admin screens using a Proxy server to help lock out intruders

Last Updated: January 28th, 2022
By: Steve
Contents
There’s a number of different ways to help secure your WordPress administration screens, and we’ll go through various ways on this site. But today’s episode is brought to you by the free and open-source Proxy Server called Squid.
If you’re a business user and your WordPress server is housed on your internal network for example, then this article is not for you. It’s irrelevant. If your IP address never ever changes, then again, this article is not for you.
Lock Down Your Admin Screens
The principle behind this level of security is to lock down your administration screens so that only certain IP addresses can access them. Anyone accessing the /wp-admin/ administration area will be given a 403 Forbidden error unless they’re listed on the whitelist of IP addresses that are allowed to access.
It’s fair to say that this section will work for you if your server is on the public internet and you’re accessing it from a static IP address from your office. Many offices will be set up this way.
Most home users though, traditionally cannot use this solution because their IP address will change fairly often – as decided by their internet provider.
Set Up A Server
To set up Squid you’re going to need a Linux based server on which to install it. You can get a really cheap VPS for this purpose from VULTR. The lowest priced server in your region will do, so for some places that’s $2.50/mth. For others it’s $5/mth. I’d recommend choosing the region closest to yourself for this or, closest to where your WordPress server is. Choosing anywhere else will slow things down.
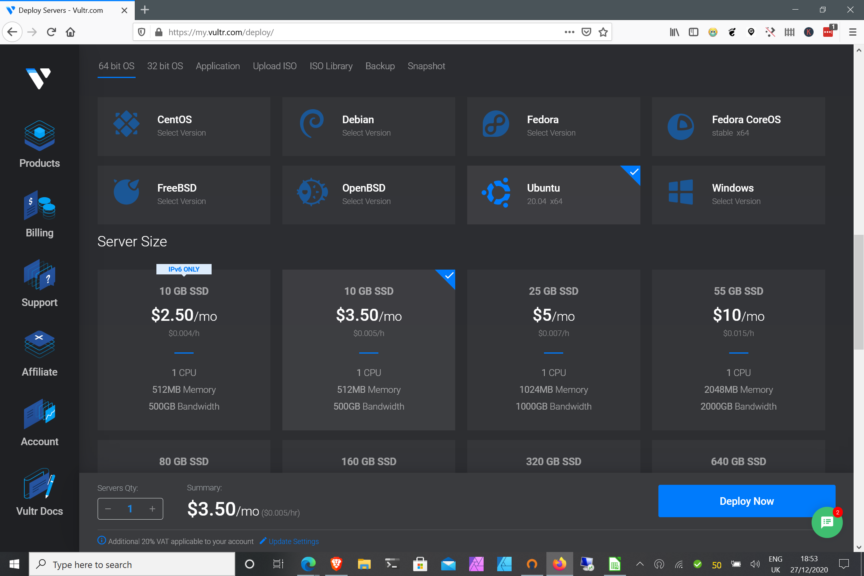
If you’re using VULTR then choose the smallest available server, on the cheapest platform. Then choose Ubuntu 20.04 LTS as the server operating system. Click the Deploy button and wait for the e-mail telling you that it’s done.
If you’ve never used VULTR before you can get $100 of credit for 30 days to trial it out. $100 is way more than you’ll need for this, so you might as well have some fun with other servers at the same time. Click here if you’re new to VULTR and want to get the $100 credit.

Login To Your New Server
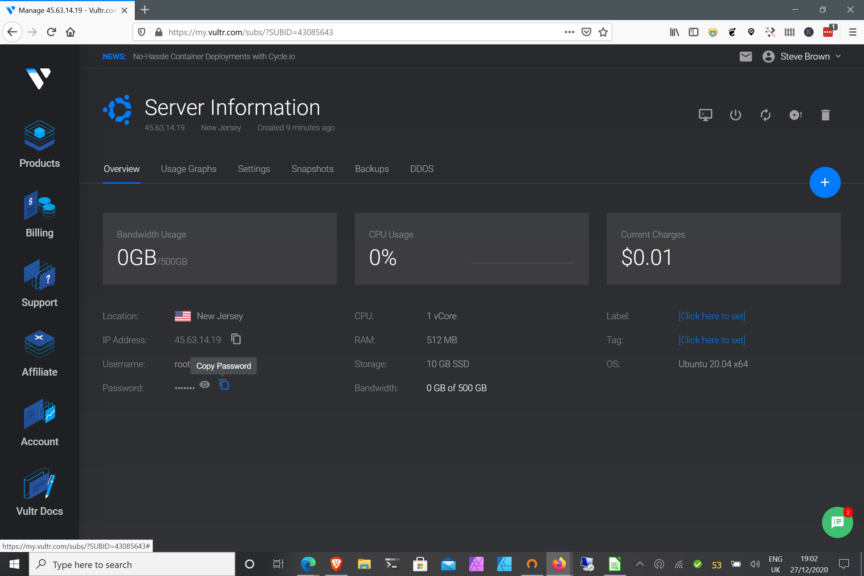
To login, select your newly created server, and look for the Password field – as in the picture below;

Copy the password. Then using an SSH client ( WSL on Windows 10 is great for this, using Windows Terminal ) ssh to your server, something like this;
ssh [email protected]Obviously you’ll need to replace the IP address above with whichever address your server has been assigned.
When asked for the password, you can copy it from that web page and paste it into the SSH password prompt. This should get you onto your new Squid VPS
Setup Squid
Installing Squid on this new server is pretty easy. Configuring it to be secure takes a little more work, but not much.
The instructions I’ve followed come from Techlear.com but there’s plenty of places that a quick search will bring up if you don’t like theirs.
So, the first thing we’re going to need to do is to make sure our package repository for ubuntu is up to date.
apt update && apt upgradeThen we can install the Squid Proxy server using;
apt install squidThis should install the squid server and start it up. By default it will listen on port 3128 for incoming connections.
Secure Squid
By default Squid will let nobody connect to it, or let everybody connect to it, depending on how it’s set up. Clearly in either case that’s not going to be acceptable.
The documentation from Techlear that I’ve referenced above suggests using IP based Authentication as one method to allow you to connect to the Squid Proxy. But we’re setting this system up precisely because we cannot guarantee our IP address will always be the same. So IP based authentication is not going to work for us.
We’re going to need user based authentication.
To set this up we’re going to have to first install the Apache Utils to generate a password file for the Squid Server and then to generate usernames and passwords within that file.
apt install apache2-utilsOnce the Apache utilities are installed we can create a username and password to allow access through the Squid proxy. It’s quite vital you do this, otherwise your Squid server may become an open proxy and will end up downloading all sorts of unsavoury web content through your VPS – potentially costing you money in excess bandwidth fees at best, and potentially ending with a knock on the door from the FBI at worst.
Create a secure username and password using;
htpasswd /etc/squid/passwd your-chosen-usernameYou can create as many users as you would like using this method.
Once you’ve created your required users, you’ll need to reconfigure Squid to only allow access to those users.
To do this, you’ll need to edit the Squid Configuration file. This will require being reasonably familiar with Linux editors. Use the following command to open the file;
nano /etc/squid/squid.confScroll through the file until you find lines that start with the word acl (ACL stands for Access Control List)
Above the first line that mentions ACLs, add the following;
auth_param basic program /usr/lib/squid3/basic_ncsa_auth /etc/squid/passwd
acl ncsa_users proxy_auth REQUIRED
http_access allow ncsa_users
This tells Squid that it is to allow access to anyone who can authenticate themselves using credentials found in the file /etc/squid/passwd – which you’ll notice is the file we told the htpasswd command to modify to add our users.
Restart squid with
systemctl restart squidand you should find that your Squid restarts and will now only accept authenticated users.
Testing Your Squid Setup
Testing your Squid setup will require modifying your web browser to attempt to use it. I’m going to assume you’re running your web browser on Windows 10 because that’s the most likely scenario. If you’re on Linux or Mac you may need to look up how to set up a web proxy for your system.
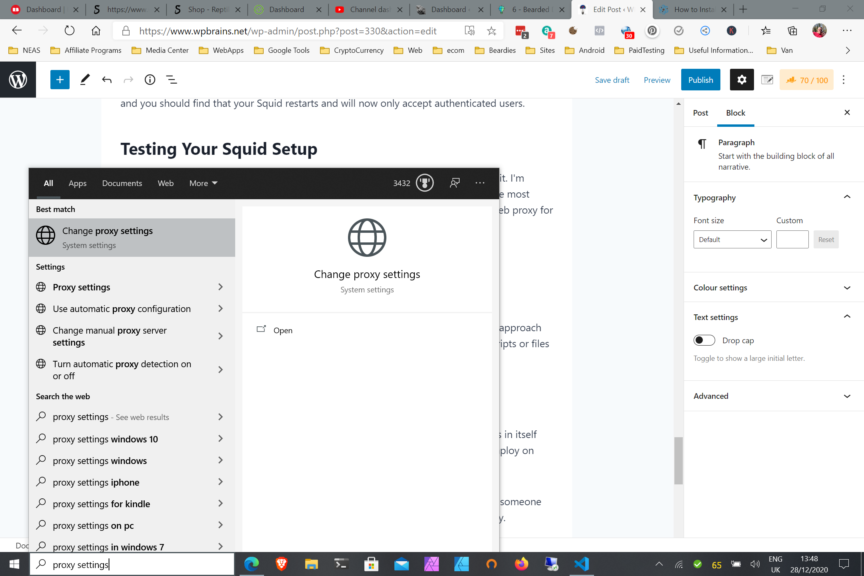
On Windows 10, type ‘proxy settings’ into the Windows Search bar in the Taskbar – the picture below gives you an idea where it will be;

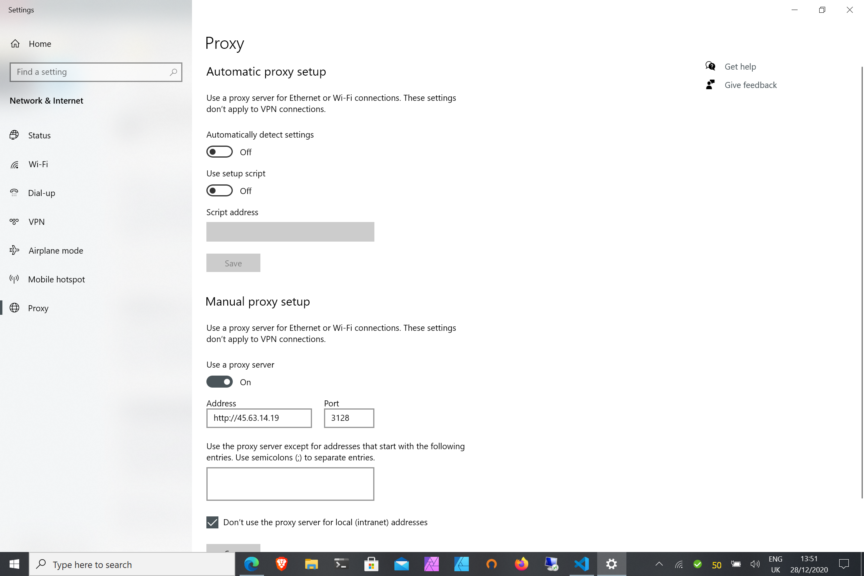
Click the Change proxy settings text, or the icon, or the Open text. This will take you to the Windows Proxy setup which will change the proxy settings for any application that can use a proxy. Microsoft Edge for example will use this proxy by default – as will Brave Browser. Firefox tends to use its own proxy settings by default in my experience.

You can see from the screenshot above that I’ve added the IP address of my new VULTR server where I set up the Squid Proxy in the form of https://45.63.14.19 and the port is set to 3128.
You will need to substitute the IP address of your new server when you enter this. I have also set ‘Use A Proxy Server’ to on.
Using Microsoft Edge visit a website. Any website will do. You may want to use something like https://whatismyip.com to make sure that you’re connecting via the proxy.
When you enter the URL and try to connect your web browser should pop up a username and password request box. This is because all your web based traffic will now go via your proxy. This is probably not what you want, but I’ll deal with that in a bit.
Enter the correct username and password that you set up above when configuring your Squid proxy, and you should be able to browse the web again – but this time all your traffic will appear to come from 45.63.14.19 or whatever IP address your VULTR server has actually been allocated.
If you are not prompted for your username and password, make sure you edited and saved the /etc/squid/squid.conf file properly and that you restarted the Squid process on the server. If you’re sure that’s correct, double check that you set the Proxy configuration correctly in Windows. Finally, make sure you’re using Microsoft Edge for testing as MS-Edge will only use the system proxy settings.
Create an .htaccess File in the /wp-admin/ folder
This assumes you’re using Apache. If you’re using NGINX then we’ll need a different approach which we’ll go into later. What we’re going to do here is tell Apache to only serve scripts or files from this folder if the person requesting them is doing so from a specific IP address.
This is the business end of the tutorial. This is the bit that tells your web server not serve anyone any files from this directory unless they’re coming via your proxy server.
You will need access to the .htaccess file on your WordPress server. Often you can do that using a File Manager application through your hosts web control panel, or you can often use SSH to login to your account area for your WordPress hosting. This aspect will vary depending on which host you use so I can’t go into detail on how to do it – you’ll need to research how to create a .htaccess file for your specific host.
However, the .htaccess file will need to be in the /wp-admin folder underneath your WordPress installation’s home directory. It will need the following contents;
## Disallow access to Admin screens from anything except My Proxy

Require expr %{HTTP:X-Real-Ip} == '45.63.14.19'
Require ip 127.0.0.1 45.63.14.19
 xx.xx.xx.xx
Of course, as before you’ll need to use the actual IP address of your newly created Proxy Server. It’s also a good idea to add the IP address of your WordPress server in place of the xx.xx.xx.xx in the code above as this will help WordPress be able to perform ‘loopback requests’ and things that are needed to do automatic updates and WordPress cron jobs.
If you’re not using Ezoic or any kind of CDN for your site (or even if you are using Ezoic, but using the WordPress plugin instead of Nameserver integration) you won’t need the X-Real-Ip line. You can delete it if you don’t need it.
These lines tell Apache that unless you’re coming from the particular IP addresses listed you must be denied access to ANYTHING in the /wp-admin directory. So, anyone coming from the internet to the /wp-admin folder will immediately be presented with a page which basically says ‘Forbidden’. They’ll not get a password prompt, or anything. Just Forbidden.
Once the .htaccess file is in place you can test whether it works properly by turning off the Proxy settings in your Windows 10 client and try to access your WordPress wp-admin screens. You should get Forbidden. Turning the proxy back on in Settings should enable you to gain access to your WordPress admin screens.
Bear in mind that you should still have a strong username and password to administer your WordPress website and you should potentially consider using 2 Factor Authentication as well. You do NOT want to compromise on the rest of the security of your site just because you now feel secure with a proxy restriction.
Using NGINX? You’ll Need This Instead
If you’re using NGINX you can still adequately lock down a directory to only allow certain IP addresses. In this case you’ll need to find the configuration file for the site you want to lock down. In most Ubuntu based servers it’s probably something like /etc/nginx/sites-enabled/site-name.conf
Then in the main server section for that virtual server you’ll need to add the following code;
location /wp-admin {
        allow xx.xx.xx.xx;
        deny all;
}
Obviously replace the xx.xx.xx.xx with the IP address of the proxy server you set up.
Setup To Restrict What Goes Via The Proxy
It’s fairly unlikely that you’ll want all of your web traffic to go via the proxy server you’ve created. Going via the proxy adds additional hops into the equation and has the potential to slow things down. It’s like driving from London to Liverpool via Glasgow. If you don’t mind all of your traffic going via that server then you can skip to the conclusion section to finalise everything.
But if you only want traffic that’s meant for your WordPress website to go via the proxy (which reduces the risk of your proxy password being sniffed too) then read on – because there’s a way.
Windows 10 allows the automatic setup of a proxy server – and part of that system allows the use of a Javascript file to do the setting up. The best part is, that Javascript can be used to determine whether a proxy should be used, and which proxy should be used. We’re going to use that flexibility to ensure that only traffic destined for our WordPress website will go via the proxy.
First, create a proxy-config.js somewhere on your computer. Your Documents directory is a good place for this. The contents of the proxy-config.js will look something like this;
function FindProxyForURL(url, host) {

    var proxied = [
        "mydomain.com",
        "anotherdomain.net",
        "3rddomain.com"
    ];

    for ( x = 0 ; x < proxied.length ; x++ ) {
        proxydomain = proxied[x];
        if (shExpMatch(host, proxydomain) || shExpMatch(host, "www." + proxydomain) ) {
            return "PROXY 45.63.14.19:3128";
        }
    }

    // by default use no proxy
    return "DIRECT";
}
Then, in the proxy settings screen, turn off the manual proxy setup, and instead use the automatic proxy setup. The script address will be the location where you saved the file above. So it may be something like;
file://c/users/yourwindowsname/Documents/proxy-config.jsDo bear in mind that Windows won’t tell you if it can’t find the script. It’ll just blindly fail. Also, bear in mind that any typo’s in the script won’t be highlighted to you either, again it’ll just fail. So if it’s not working, check that you’ve got the location right, then check the syntax of your script.
You can check the syntax of your script here at PAC file tester (thorsen.pm)
Conclusion
Bear in mind that this solution is just one layer of your overall security solution. It has in itself some significant weaknesses so this should not be the only security measure you employ on your WordPress Server.
This is because the Squid Proxy server password file is somewhat insecure in itself. If someone gains access to your Squid server, they can brute force your password relatively easily.
Also, the proxy username and password will be passed in plain text between the Squid proxy and your web browser every time you request a page. So if you’re on a public network, for example at a railway station, or using the WiFi on the bus and someone is sniffing your traffic they’ll easily be able to see your Squid proxy username and password. Note that so long as your WordPress admin screens are using https:// prefix, then anyone sniffing the network will still not be able to see your WordPress admin username and password.
However, what this solution does do is stop crackers from China and Russia (for example) from brute forcing their way into your actual WordPress server because they’ll never know that in order to actually gain access they must go via your Squid Server.
Some would argue this is security through obscurity but it’s not quite. Security through obscurity would be changing the URL of your admin screens and hoping nobody finds them. This method requires access through a second server in order to access your admin screens. Even if your Squid Server is compromised, the cracker will still need to gain access through all the other security measures you should have in place. This method just stops them even making a start at that. It’s like a perimeter fence around the main security.
But, make sure the rest of your WordPress security is up to scratch. For example, remove XML-RPC if you don’t need it. Keep all your plugins and themes up to date. Keep WordPress itself up to date. Don’t use Premium plugins unless you’ve paid for them from the original developers. And use strong passwords and usernames (not admin!) for your administrator accounts.
If you like this article please leave us a comment below. If we’ve completely missed something here and you disagree with anything in the post please also let us know. Security is an ever evolving practice. We use this method to lock down our admin screens, but if there’s a weakness here we’ve missed we’d be keen to know about it 🙂


